Heartfelt, warm winter wishes!

Hi!

A quick blog post, sharing with you one of my latest card creations:


More details including a full supply list can be read in Imagine blog (link *here*)


Hope you stay cozy, my friend!
 
post signature

Cute Christmas card for December CS blog challenge

Hi,
December is here, and so is the new Craft Stamper Magazine blog challenge. Entering is very easy, as "Anything Goes"; just use stamping somewhere on your project!


Our generous sponsor this month is Stampin' Unicorn, and one lucky winner will get three stamping plates and two sets of wonderful patterned papers!


Isn't the prize just amazing! In addition, the design team will vote for their favourite projects, and the design winner of this challenge will have their work published in the April issue of Craft Stamper! Worth playing for, isn't it!

My stamped project for December is a cute Christmas card I made using a Simon Says Stamps stamp 
set and Sizzix dies:


For colouring I used my Promarkers. Isn't the festive trio just adorable!


Here's the list of main supplies I used:
  • 'Furry Christmas'. Clear stamp set by Simon Says Stamp
  • 'Stitched Ovals'. Thinlitz die set by Sizzix
  • 'Festive Greens'. Thinlitz die set by Sizzix
  • Patterned papers by 13Arts
Wishing you a wonderful weekend!
post signature

Easy DIY: Stamping on Glass

Hi!
Hope your weekend went well.
I wanted to share with you a fun DIY idea: A stamped glass jar! For this project you will not need a long list of special supplies, and it's so easy even your kids can do it!

My picture tutorial with full supply list can be read in Imagine blog, link is *here*


Happy crafting!


Scrapbooking layout: Lucky. For Craft Stamper blog challenge

Hi!
In Craft Stamper blog so many gorgeous stamping projects have already been linked to our November blog challenge. I hope you play along: There's a cool prize to be won for one lucky person: A stamp sheet of the winner's choise by RubberDance!


My challenge inspiration project is a 12" layout I made a short while back:


Lately I've been mainly creating cards, so it was a true pleasure to play on a large 12" paper. Scrapbooking is so much fun!
Many of the background elements already existed on this lovely paper by Cocoa Daisy; I just added a few more stamped patterns.


View all the gorgeous DT inspiration projects *here*. Hope I'll have a chance to see a picture of your challenge entry among the November projects!

Wishing you a wonderful day, thanks for stopping by in my blog!

Hugs,
post signature

A Catty Birthday Card for Craft Stamper Blog Challenge

Hi!
Can you believe it's already November?! With my Christmas cards still in early planning phase I wanted to show you a cute birthday card I made for Craft Stamper November blog challenge:
 

The adorable group of cats was stamped with my new 'The Cat's Meow' stamp set by Mama Elephant. I bought the clear set of stamps together with the coordinating die set, and being able to simply die-cut the coloured image is always a big help.

For the background I used an old Basic Grey paper that I decorated with dabbing yellow acrylic paint through a stencil.


I hope my catty birthday card inspires you to play along our November Craft Stamper Take It Make It challenge. One lucky randomly chosen winner will get an amazing prize:  A stamp sheet of the winner's choice from RubberDance collection!


For all challenge details please visit Craft Stamper blog *here*.

Wishing you a nice day!
Hugs,
post signature

Happy Halloween!

Hi!
Hope your weekend went well. Maybe you had a chance to go to a Halloween party?

My kids are celebrating Halloween on Tuesday, and I had an important task to do: My daughter wanted to give her friends Halloween cards on the party night, and I had promised to make her a few. The main images I had die-cut already a while back, so yesterday I put the elements together and finished the cards.

Here's how they turned out:

Halloween cards with Sizzix Big Shot

Isn't that Halloween die set ('Sizzix Thinlits: Spooky') cute! I loved playing with the paper dolls; that versatile design is so inspirational! I even used the same doll for a bit different card theme; I will show you the girly birthday card in another post soon.

Halloween card with Sizzix Big Shot

The yellow oval in the background is die-cut from a sheet of white paper I had painted with spray mists. Having a quite solid color behind the main images allowed me to use a patterned paper underneath; a solid color balanced the look and the card did not appear too busy.


The black fence is die-cut using a Sizzix / Tim Holtz border die from a few years back.


Halloween cards with Sizzix Big Shot

I think she liked the cards, and I'm hoping her friends will like them, too!

Wishing you a nice new week!

Hugs,
post signature

Paper weaving on a birthday card

Hi!
I love trying out new techniques for card backgrounds! Inspired by paper weaving tutorials I found on Pinterest I made this flower card:


There are many great paper weaving designs that are suitable for a card background. Paper weaving is not difficult at all, but for avoiding trouble along the way you should measure the width of the strips with a ruler (both background openings and the strips you're using for weaving), and use a ruler and a crafting knife for cutting.


I made a picture tutorial for this card; it can be read at Imagine blog *here*


Wishing you a wonderful weekend! 


Thanks for stopping by in my blog :)
post signature


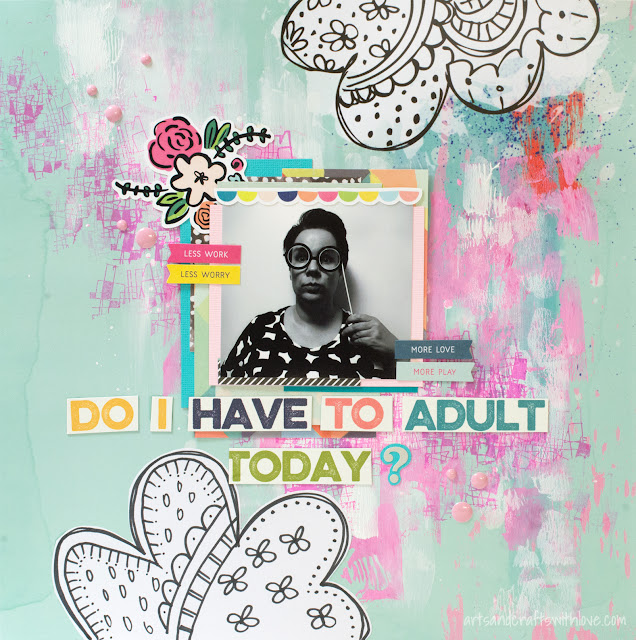
Scrapbook layout: Less work, less worry. More love, more play.


Hi!

Late August I spent the most amazing weekend in beautiful Egersund in Norway. Thinking back on that weekend still brings a smile to my face: Spending time with friends, crafting 'till midnight, learning a lot on Kate Crane's workshops, and enjoying the beautiful Norwegian scenery. What else could a crafty girl wish for?

There will be a separate blog post about the amazing workshops, but before that one's out,  I wanted to share with you a layout I made during the crop.

The Cocoa Daisy background paper had some fun doodling on the top of the page, and as I needed a balancing element on the bottom of the page, I followed the given style on the bottom flower that I draw myself. The flowers are not identical, but I think I was able to imitate the original style quite nicely. My flower was drawn on white paper, cut out, and glued on the background paper.


I'm so happy how this simple layout turned out! The title is cut from a journaling card, and I thought it matched pretty well the playful picture :)


Thanks for stopping by in my blog; wishing you a great day!


Hugs,

Tag for October Craft Stamper blog challenge

Hi!
Hope your weekend has went well. In Southern Finland rain has been pouring all weekend, giving me the perfect excuse to postpone garden work and to spend time at my crafting table :)

On Friday started the new Craft Stamper Take It Make It challenge. Our generous sponsor, IndigoBlu, has given an amazing prize which will be sent to one lucky winner: Three gorgeous stamp sets! Really worth playing for, isn't it!


My take on the 'Anything Goes' challenge is a layered mixed media tag:


I started with decorating the background with a pattern stamp, masking some areas with paper strips. Then I colored the background with a few Distress Oxide colours, picking up the water-sprayed colours from my craft mat.


Before gluing down the stamped and colored main image, I added a thin layer of yellow and orange acrylic paint on the tag, and decorated it with a stencil and white acrylic paint. The orange colour is not exactly the same than what I used on the girl's shirt, but quite close to it. For coloring the stamped image (design by Daniel Torrente, for Stampotique) I used my new favourite pens, Zig Clean Colors. They're fabulous to use! 


So just follow *this link to Craft Stamper Magazine blog* to read more about our October challenge. Before linking your entry, pls check the challenge guidelines *here*.

Wishing you a wonderful new week!
Thanks for stopping by in my blog :)
post signature

Art journal page: Glimmer of Light

Hi and happy Wednesday!
Today I wanted to share with you my latest mixed media art journal page with black, white, and a hint of gold:


I got the idea for this page when flipping the pages of my Moleskine art journal. I came across a page I had painted with black gesso, and thought that a dark, solid black background would match perfectly the strong quote stamp text by Visible Image.
After adding a second layer of black gesso on the page, I dabbed some white gesso on the page, creating the background for my glimmering light bulb:


Once the paing was dry I stamped and heat-embossed the light ray pattern and the sentiment text on the page. The light lightbulb is stamped on white paper, cut out, and glued on the page.

To add even more glimmer, I sprinkled some gold colour heavy embossing powder flakes on the page. I did not use any embossing ink, so for keeping the flakes on the paper during heating, I heated the page from underneath. Worked out well!


For more information on the Visible Image stamps I used, please click on the pictures below:


Wishing you a wonderful week!
Hugs,
post signature