Bookmarks that sooth the soul

Hi!
Over the past few weeks I've been really enjoying my holiday; spending time with my family, travelling, relaxing, and reading. A good book needs a beautiful bookmark, and I'm sharing with you two new bookmarks that both have the same simple but colourful design:


I started with cutting two panels from white cardstock, and inked them with bright Distress ink colours. Before stamping the player images on the panels I sprinkled plain water on the inked surface to create fun splash textures.


It's always fun to see how an identical design looks very different when the colours are changed. The bookmarks are identical, as I used a stamping platform tool to stamp the main images.With such a tool you can create several stamped projects on one go, but also stamp the image several times on the same spot and easily get a true dark black image. A crispy black finish looks especially good when using silhouette images like these player men.

I taped the stamped panels on black cardstock, leaving a thin border around the eges. On the bottom of the bookmark I left a bit wider border, as I wanted to decorate the edge. Little details can make a big difference!
I punched a row of holes, and stiched with matching embroidery yarn simple blanket stitches on the edge. I think it gave a nice finishing touch to the project!

The lovely stamps are all from Visible Image collection; for more details on the products please click on the images on the bottom of this post. The quote text stamp I used is from an older version of the 'Music Speaks' set, however, the same text can be found in the new set, too. See the picture below.


Wishing you a lovely week. Maybe you're also enjoying your vacation and have some time for creative fun, too! 
post signature

Stencil Girl Blog Hop!


Hi!
My name is Elina, welcome to my blog!

Imagine and Stencil girl DT's have come together for an amazing three days blog hop, and today is our second day.

Here's a list of our bloggers participating today in this amazing blog hop:
Imagine:
Elina Stromberg (you are here!)

Stencil Girl:

One lucky winner will receive both a $25 Gift Certificate to StencilGirl Products AND a $25 Gift Certificate to Imagine Crafts!
Visit the fabulous designers from both teams and comment for your chance to win!
The more blogs you comment on, the more chances you have to WIN! (One comment per blog please.)
You have until Sunday, July 23rd at 11:59PM Central Time to leave your comments. Winner will be announced on StencilGirl's Facebook page and Imagine Crafts’s Facebook page on Monday, July 24th.


My Stencil Girl blog hop project is a colourful, round mixed media canvas:


For this project I used two different stencils; background is stencilled with 'Modern Buds' by Rae Missigman, and the gold coloured 'Be Happy' stencil/mask is designed by Maria McGuire. I just love them both!

I started the project with preparing the canvas with white gesso, and once dry I decorated the background with Metallic Gold and Metallic Copper Creative Mediums. The stencil pattern is repeated three times, and before moving onto the colouring step I let the textures airdry properly.


The canvas background is colored with Fireworks! mists; the first layer of yellow and pink is misted, and once dry I added more color with a brush. Metallic Medium is resisting Fireworks!, so the texture remained beautiful and shiny.


The 'Be Happy' sentiment is heat embossed with gold Embossing Powder. I used Clear VersaMark ink and a Jumbo Dauber to ink the background underneath the mask; I'm happy how crispy the embossed image turned out!

I love playing with contrasts, so for highlighting the colorful background I decided to embellish the canvas with black and white elements only. I stamped the flowers and leaves on heavy white paper, colored gently with cool grey markers, and cut out. Before gluing them on the canvas I pressed them in the center with a stylus to bend the petals a bit for making the flowers bit dimensional.
Flower stamps are from Altenew set 'Adore You'.


This canvas will end up on my crafting room wall. Love the bright colors, beautiful flower images, and the metallic golden background textures. Looking at it makes me happy :)


Materials used:

Stencil girl:
* Modern Buds 
* Be Happy 

Imagine:
* Fireworks! Craft Sprays: Lilac Posies & Dandelion
* Creative Medium Metallic: Gold, Copper
* VersaMark Clear ink
* Embossing Powder Gold
* Jumbo Dauber
* Memento Tuxedo Black 

Other:
* Stamps: Altenew 'Adore You'
* Grey markers
* Scissors
* Glue
* Heat Gun

Remember to visit also the blogs where yesterday's projects were showcased, start your journey *here*. Blog hop continues tomorrow, so stay tuned!

Happy hopping! And remember to leave a comment for a chance to win!
post signature

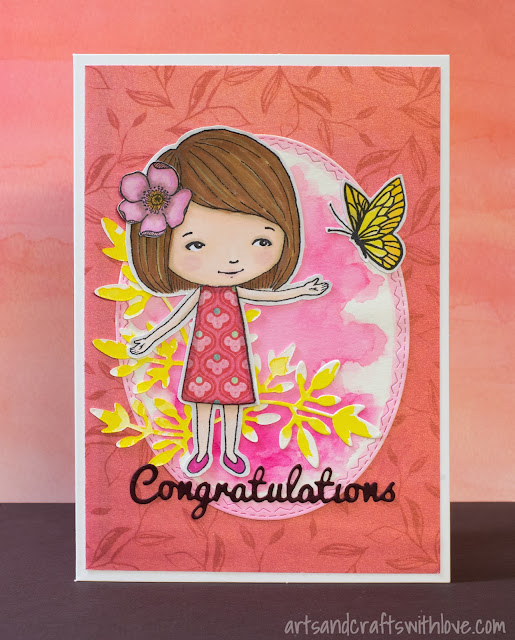
Cute girly birthday card

Hello,
Craft Stamer July blog challenge 'Take it, Make it' continues. 'Anything Goes', as long as there's stamping somewhere on the project. Easy, isn't it!
Read all the challenge details and get inspired by the already linked projects *here*.

Here's my second July project for this challenge:


The cute girl image is a Carabelle Studio stamp designed by Zorrette. Love it! The original stamp set had also a bird and a beautiful sentiment text with it, but on this project I used a die-cut title, a butterfly by Stampendous and a flower by Altenew.


The background oval is die-cut with a Tim Holtz/Sizzix die and painted with liquid watercolors.


Wishing you a wonderful weekend! Hope you get inspired to play along our challenge!

Hugs,
post signature

Musical Birthday Card

Hi and Happy Wednesday!
Today I'm sharing with you a birthday card I made using stamps from three Visible Image stamp sets:


I started the project with inking the background with a few shades of pink/red Distress inks, using darker tones on the edges and lighter in the middle.

 
Once the background was ready I stamped and heat embossed the saxophone player on the card. Love his cool silhouette!
The musical bubbles are stamped and heat embossed, too. I used the double circle stamp from the 'Rays of Light' set, as the large circle was just the right size to fit the letter stamps from the new 'Alphabetical' set.


Before stamping the letters into the circles I removed the ink from the heat embossed bubbles: Distress inks react well with water, so I brushed plain water on the circles, let it react for a few seconds, and then picked up the ink by pressing it with a paper towel. The little white spots were done the same way; using a small brush I put drops of water on the inked surface, let it sit for a while, and pressed with a paper towel.Works like magic!


For more information on the stamp set I used, please click on the pictures below:

Wishing you a wonderful day. Thanks for stopping by in my blog!

post signature

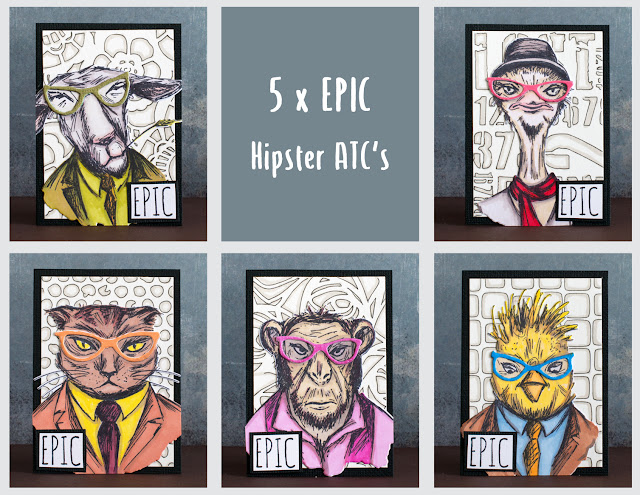
EPIC Hipsters on ATC cards!


Hipster ATC's with Tim Holtz stamps and Sizzix dies

Hi!
Today I'm sharing with you a set of five ATC's that I made using the wonderful Tim Holtz Hipster stamps and matching Sizzix dies. I wanted to see how the hipster images would work on small ATC's, as I had been using them on larger projects only. Well, I think these versatile and cool images are perfect for any sized projects, aren't they! :D

Hipster ATC's with Tim Holtz stamps and Sizzix dies
I stamped the images on white paper and colored with my Promarkers. Love how well the matching dies cut even the finest details of the images! And those cool glasses... I'm sure I'll be using them on many other projects, too. 

Hipster ATC's with Tim Holtz stamps and Sizzix dies


Hipster ATC's with Tim Holtz stamps and Sizzix dies

For highlighting the colorful images I decided to keep the background simple. Using my favourite Tim Holtz stencils I traced the patterns with a thin black marker. I changed to a grey Promarker, and re-traced the patterns to create bit of shadows on the designs. Love how the backgrounds turned out!


Hope this set will bring a smile to your face :)
Wishing you a wonderful day!

post signature

Animal Instinct for Craft Stamper TIMI DT


Hi!
It's the first Friday of July, and new Craft Stamper Take It Make It challenge has started. 'Anything Goes', as long as you have used stamping somewhere on your project. Hope you get inspired and play along!
This monthly challenge always comes with a cool prize: This month our generous sponsor is ...
... and one lucky winner will get these three cool stamp sets! Such a great prize!
STAMPlorations is also offering a great benefit for their readers/followers:
For the whole month of July, when the readers/followers place an order of at least $15 from the store, they can get 20% off on all stamps, stencils, and dies using the code: CRAFTSTAMPER

All challenge details and the amazing projects by our Design Team members can be viewed here.

My July TIMI project was inspired by a new stamp set by AALL & Create, designed by super talented and always inspiring Olga Heldwein. Isn't this stamp just amazing!

I covered the stamped image with masking fluid before painting the background. Once the watercolour layer was dry I added some texture with white embossing paste. I did not want the texture to stand out too much, so I inked it with a yellow Distress ink.
For colouring of the fox I used my Promarkers.


I hope you like my card! And if you love the fox stamp set as much as I do please visit AALL&Create web shop to get your own set! :D

I wish you a wonderful weekend. Hope you have time to do something you love!

Hugs,


Scrapbooking layout: Heart of gold

Hi!
Today I wanted to share with you a scrapbooking layout I made a while back, using gorgeous shimmering Imagine Fireworks! mists, Altenew stamps, and Sizzix dies:


I just love those flower stamps and the matching dies! For coloring the flowers I used liquid All-Purpose Inks, my favorites!


The title is die-cut using Sizzix/Tim Holtz alpha dies. I pressed the bottom parts of the letters on VersaMark embossing ink, dipped them in gold color embossing powder, and heat-set with my heat gun. Little details do make a difference! :)


For more project details and a complete list of supplies please visit Imagine blog *here*.
Wishing you a wonderful weekend!


Color of the month: Pineapple!

Hi!
Imagine color of the month is the lovely, bright Pineapple!


For me, yellow is the color of sunshine and warm summer days. It inspired me to make this summer themed flower card:


The fun texture on the bottom of the card was created with yellow irRESISTible Pico Embellisher; it's a mixed media fluid that is an easy way to create dimensional texture on any crafting project.


The flowers are built from two layers: I colored the bottom layer quickly with my markers, then stamped the flowers again on a piece of white cardstock, and coloured them with a few yellow tones. I cut the flowers out, pressed the petals gently with a stylus, and glued on my card. For decorating the flower centres I used small micro beads.


For more Pineapple inspiration I suggest you hop over to Imagine blog to read a full supply list for my project and to see how the vibrant color has inspired the other Imagine Artists.

...AND...
There's a cool color challenge for you to play along, too! Woohoo! One lucky winner will get a $30 gift card in Imagine shop! Just follow the above Imagine blog link to read all the details.

Wishing you a wonderful weekend! Hope it will be filled with sunshine :)
post signature